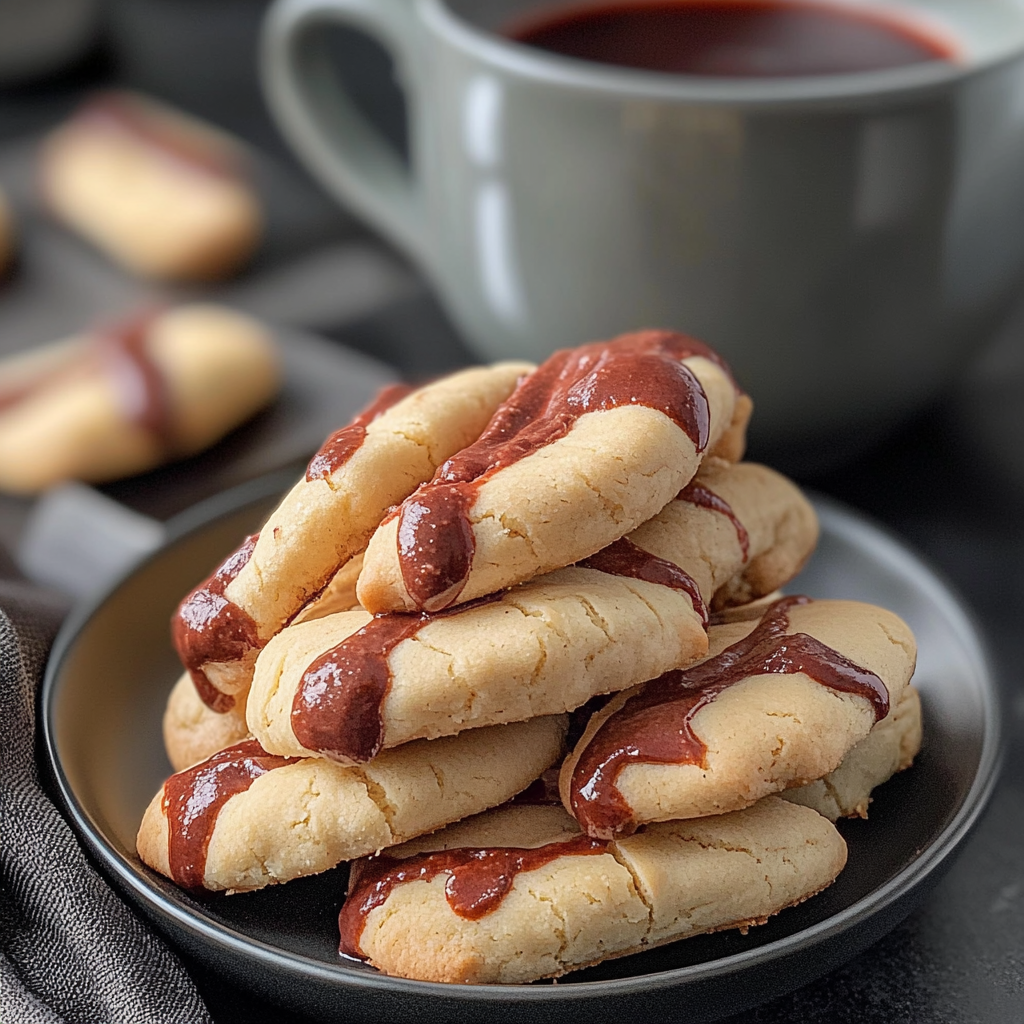
Witches Fingers Cookies are delightfully creepy yet irresistibly delicious treats that will make your Halloween gatherings unforgettable. Picture this: a batch of cookies shaped like spooky fingers, complete with almond nails peeking out, giving you that perfect blend of fright and delight. creepy dessert ideas.
These cookies are not just for Halloween; they make the perfect addition to any gathering where fun meets flavor. I remember my first attempt at baking these wickedly delightful fingers with my friends, and let’s just say, we had more fun than expected—especially when we started “snacking” on our creations before the party even began!
Why You'll Love This Recipe
- These Witches Fingers Cookies are easy to prepare, making them perfect for novice bakers and families alike.
- The unique combination of almond flavor and buttery texture creates an irresistible taste that everyone will love.
- Visually striking with their eerie appearance, they’re sure to be a conversation starter at any event.
- Whether for Halloween or just for fun, they are versatile enough to adapt with various toppings or decorations.
Ingredients for Witches Fingers Cookies
Here’s what you’ll need to make this delicious dish:
- Unsalted Butter: Use softened butter for the best consistency, as it helps achieve a rich, creamy dough.
- Sugar: Granulated sugar sweetens the dough while adding a nice crunch to the cookie’s exterior.
- Eggs: One large egg binds the ingredients together while adding moisture; room temperature eggs work best.
- Vanilla Extract: Use pure vanilla extract for a deeper flavor profile that complements the nuts.
- All-Purpose Flour: This forms the base of your cookie dough; sift it for smoother mixing.
- Almonds: Whole almonds serve as “witches’ nails” on each cookie—choose the largest ones you can find for maximum effect!
- Baking Powder: A leavening agent to help your cookies rise slightly while keeping them tender.
- Green Food Coloring (optional): Add a few drops to give your cookies an eerie green hue if desired.
The full ingredients list, including measurements, is provided in the recipe card directly below.
How to Make Witches Fingers Cookies
Follow these simple steps to prepare this delicious dish:
Step 1: Preheat and Prepare
Preheat your oven to 350°F (175°C). Line two baking sheets with parchment paper or silicone baking mats so those creepy fingers don’t stick.
Step 2: Cream Butter and Sugar
In a mixing bowl, combine softened unsalted butter and granulated sugar. Beat until light and fluffy—this should take about three minutes. You’ll know it’s ready when it looks like fluffy clouds!
Step 3: Add Eggs and Vanilla
Crack in one large egg along with a splash of pure vanilla extract. Mix until fully incorporated; your mixture should now resemble a tasty creamy mess.
Step 4: Combine Dry Ingredients
In another bowl, whisk together all-purpose flour and baking powder. Gradually add this dry mixture into the wet ingredients while stirring gently until fully combined. If you’re feeling adventurous, add a drop or two of green food coloring during this step!
Step 5: Shape Those Fingers
Take small portions of dough (about two tablespoons each) and roll them into finger shapes. Press an almond into one end of each “finger” to create the nail. Don’t forget those little knuckles—just pinch them gently!
Step 6: Bake
Place your formed cookies onto prepared baking sheets about two inches apart. Bake in preheated oven for about 12-15 minutes or until lightly golden brown around the edges.
Once they’re done baking, transfer those spooky fingers onto wire racks to cool completely before serving.
Serving suggestion: Present these eerie delights on a platter garnished with fake spider webs (cotton candy works great!), and watch as your guests squeal with delight—or terror!
Enjoy every bite of these Witches Fingers Cookies; they are sure to cast a spell over anyone who dares take a bite!
You Must Know
- Witches Fingers Cookies are not just a spooky treat; they bring laughter and fun to any Halloween gathering.
- These whimsical cookies are easy to make and can be decorated to suit your festive spirit.
- Perfect for kids and adults alike, they add a dash of creativity to your dessert table.
Perfecting the Cooking Process
To whip up these delightful Witches Fingers Cookies, start by creaming your butter and sugar until light and fluffy. Then, mix in the eggs and vanilla before gradually adding the dry ingredients. Finally, shape the dough into fingers and add almonds as nails for that creepy touch. For more inspiration, check out this Delightful Easter MM Cookies recipe.
Add Your Touch
Feel free to get creative with your Witches Fingers Cookies! Swap out almond slivers for chocolate chips or use green food coloring for an extra eerie effect. You can also sprinkle edible glitter on top for a magical finish or substitute different nut varieties based on preference.
Storing & Reheating
Store your Witches Fingers Cookies in an airtight container at room temperature for up to a week. For longer storage, freeze them in a single layer before transferring to a freezer bag. Thaw at room temperature when you’re ready to enjoy these spooky treats again!
Chef's Helpful Tips
- To ensure your Witches Fingers Cookies turn out perfectly every time, remember that chilling the dough helps maintain their shape while baking.
- Don’t overmix after adding flour; this keeps the cookies tender.
- Lastly, let them cool completely before decorating for best results.
Sometimes I catch my friends eyeing my Witches Fingers Cookies like they’re about to cast a spell! Their giggles when they take that first bite always remind me how cooking can bring people together in the most whimsical ways.
FAQs :
What are Witches Fingers Cookies made of?
Witches Fingers Cookies typically include basic ingredients such as butter, sugar, flour, and eggs. The unique aspect of these cookies is the addition of almond slivers or whole almonds to create the appearance of fingernails. Food coloring can also be used to give the cookies a spooky green or brown hue. This combination results in a delightful treat that is not only fun to make but also delicious to eat.
How do I store Witches Fingers Cookies?
To keep your Witches Fingers Cookies fresh, store them in an airtight container at room temperature. They can last up to a week if stored properly. If you want to extend their shelf life, consider freezing them. Wrap each cookie individually in plastic wrap and place them in a freezer-safe bag. When you’re ready to enjoy them, simply let them thaw at room temperature.
Can I customize the Witches Fingers Cookies recipe?
Absolutely! You can customize Witches Fingers Cookies by adding different flavors or toppings. For instance, you can incorporate chocolate chips for added sweetness or use different nuts for the fingernails. Additionally, experimenting with food coloring can give your cookies a more vibrant look. Personalizing your cookies makes baking even more enjoyable and allows for creative expression. For more inspiration, check out this Delicious Easter Cookies recipe.
Are Witches Fingers Cookies suitable for Halloween parties?
Yes, Witches Fingers Cookies are perfect for fun Halloween treats that add thematic flair to your celebration.
Conclusion for Witches Fingers Cookies :
Witches Fingers Cookies are a delightful blend of fun and flavor, making them an ideal treat for Halloween or any gathering where you want to impress guests. With simple ingredients like butter, sugar, and almond slivers, they are easy to prepare and customize. savory Halloween appetizers By storing them correctly, you can enjoy these spooky delights throughout the week. themed Halloween appetizers Whether you’re participating in a themed party or just looking for a unique dessert idea, these cookies are sure to enchant everyone who tries them!
Witches Fingers Cookies
- Total Time: 35 minutes
- Yield: Approximately 24 servings 1x
Description
Witches Fingers Cookies are a fun and spooky treat perfect for Halloween or any festive gathering. These eerie cookies, shaped like creepy fingers with almond “nails,” offer a delightful combination of buttery sweetness and nutty flavor. Easy to make, they are sure to impress both kids and adults alike. Get ready to enchant your guests with these whimsical, delicious cookies!
Ingredients
- 1 cup unsalted butter, softened
- 1 cup granulated sugar
- 1 large egg, room temperature
- 2 tsp pure vanilla extract
- 2 ½ cups all-purpose flour
- 1 tsp baking powder
- 24 whole almonds (for nails)
- Green food coloring (optional)
Instructions
- Preheat oven to 350°F (175°C) and line baking sheets with parchment paper.
- In a mixing bowl, cream the softened butter and sugar until light and fluffy, about 3 minutes.
- Add the egg and vanilla extract; mix until combined.
- In another bowl, whisk together flour and baking powder. Gradually add to the wet mixture while gently stirring. If desired, mix in green food coloring.
- Shape dough into fingers (about two tablespoons each), pressing an almond into one end of each finger for the nail.
- Bake for 12-15 minutes or until lightly golden around the edges. Let cool before serving.
- Prep Time: 20 minutes
- Cook Time: 15 minutes
- Category: Dessert
- Method: Baking
- Cuisine: American
Nutrition
- Serving Size: 1 serving
- Calories: 140
- Sugar: 7g
- Sodium: 70mg
- Fat: 8g
- Saturated Fat: 5g
- Unsaturated Fat: 2g
- Trans Fat: 0g
- Carbohydrates: 16g
- Fiber: 0g
- Protein: 2g
- Cholesterol: 30mg


0 thoughts on “Spooky Witches Fingers Cookies for a Hauntingly Good Time”